



On Astra Malorum, O.S.C.A.R. isn’t a boss you rush into killing the moment he appears. This elite enemy is designed to pressure you over multiple rounds, not to be dumped with raw firepower in a few seconds. If you try to fight him like a normal miniboss, you’ll waste ammo, get swarmed, and probably go down. The good news is that O.S.C.A.R. follows very clear rules. Once you understand how he works and how the map is built around him, killing him becomes a controlled and repeatable process.
Table of Contents
- Understanding how O.S.C.A.R. works
- Why you can’t damage O.S.C.A.R. at first
- Traps are the real way to kill O.S.C.A.R.
- The overcharge method (and why the drone matters)
- A quick word on avoiding him
Understanding how O.S.C.A.R. works
O.S.C.A.R. patrols Astra Malorum at a slow pace and will only chase briefly when he spots you. You’re never forced into a fight. If things get messy, simply create distance and he’ll return to roaming the map. This is intentional: he’s meant to exist alongside regular rounds, not replace them.
What makes him dangerous isn’t speed, but pressure. He boosts nearby zombies, giving them red eyes, faster movement, and higher damage. On top of that, his laser attacks hurt a lot if you ignore them for too long. The real problem, though, is his shield.
Why you can’t damage O.S.C.A.R. at first
When O.S.C.A.R. spawns, he’s protected by flying drones that make him immune to almost everything. Bullets, grenades, abilities — none of it matters until those drones are dealt with. O.S.C.A.R. himself has no elemental weakness, but the drones absolutely do.
The best option here is Brain Rot. Weapons using this ammo mod tear through the drones much faster than standard damage. Once the drones are destroyed, O.S.C.A.R. loses his shield and can finally take damage. If you’re running something else, Light Mend with the Big Game augment can help chip his health, but it’s slower and less consistent.
When a drone is destroyed, it drops wreckage on the ground. Pick it up. You’ll need it later if you’re going for the full kill sequence.
Traps are the real way to kill O.S.C.A.R.
Even without his shield, O.S.C.A.R. has a massive health pool. Trying to gun him down directly is inefficient and risky, especially as rounds climb. The map gives you much better tools: traps. These are not optional if you want a clean kill.
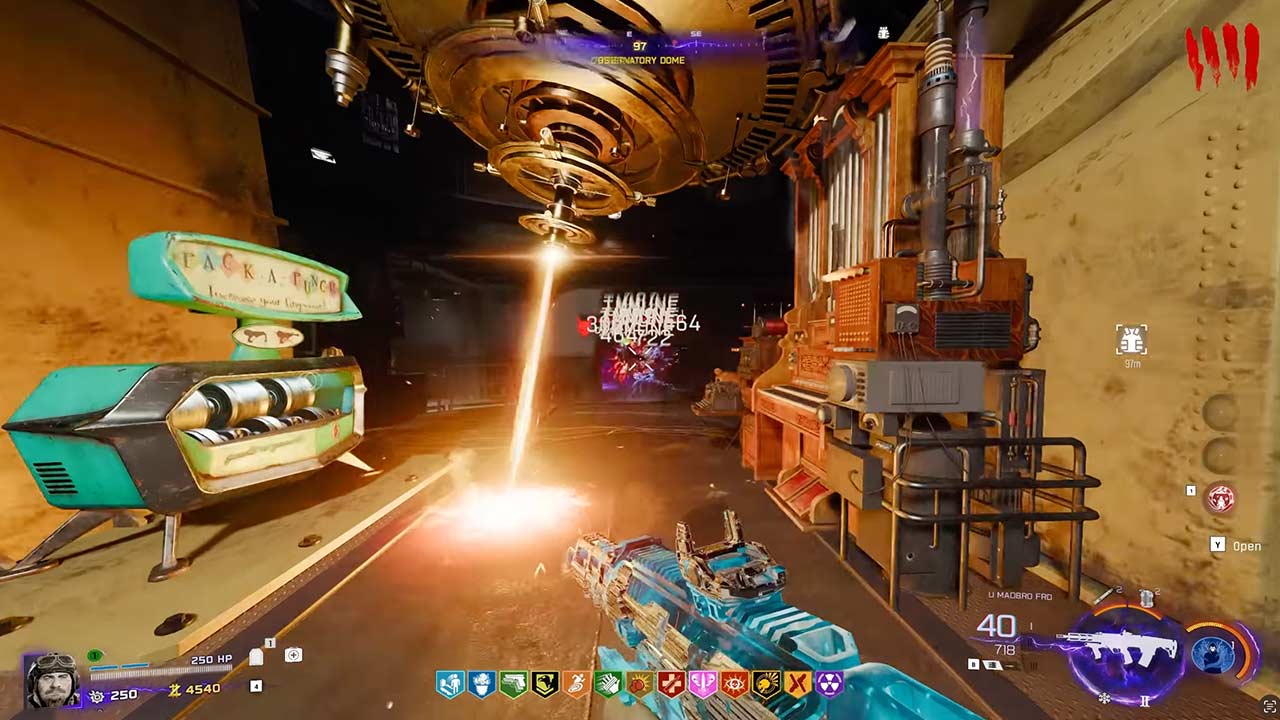
One of the most reliable methods involves the area near the Pack-a-Punch. After turning on the power, you can activate the mechanism tied to the telescope and the organ. When O.S.C.A.R. is positioned on the platform between them, aiming the telescope toward the sun triggers a concentrated beam of light. If timed correctly, it kills O.S.C.A.R. instantly. No drawn-out fight, no wasted ammo.
Another method uses Cryofreeze. Shooting Aetherium Crystals around the map with Cryofreeze ammo causes them to drop Absolute Zero shards. Collect three, bring them to the museum, and interact with the model rocket. Lure O.S.C.A.R. behind it before activation, and the blast will finish him off in one shot.
The overcharge method (and why the drone matters)
If you picked up the destroyed drone earlier, you’re already partway through the final method. You’ll need two more items. Near the spawn area, find Ol’ Tessie, the pickup truck. Shooting its hood with a Pack-a-Punched weapon drops a car battery. The last piece comes from a blinking lamppost somewhere on the map, which drops Aberrant Wires when interacted with.
With all three items, head to the Luminarium and activate the trap there. This overcharges O.S.C.A.R. if he’s inside the effect, destroying him after a short delay. This method is slower to set up, but fully repeatable once you know the steps.
A quick word on avoiding him
It’s worth saying this clearly: you don’t have to kill O.S.C.A.R. every time he appears. He respawns after a few rounds, and sometimes the smartest play is to ignore him, manage the horde, and wait until you’re in control of the map. His slow movement makes him easy to kite, and traps can be prepared in advance rather than triggered in panic.
If you want a smooth run on Astra Malorum, treat O.S.C.A.R. like part of the environment. Break the drones, lead him to the right spot, use what the map gives you, and move on. That’s how the fight is meant to be played.
FAQ – O.S.C.A.R. in Black Ops 7 Zombies
Can you kill O.S.C.A.R. with regular weapons?
Yes, but only after destroying his drones. As long as they’re active, O.S.C.A.R. is fully immune. Even then, his health pool is extremely high, so pure gun damage is slow and inefficient compared to traps.
What ammo mod works best against O.S.C.A.R.?
O.S.C.A.R. himself has no elemental weakness. However, his drones are very weak to Brain Rot, which makes it the most reliable choice to remove his shield quickly. Other ammo mods won’t deal with the drones as effectively.
Does O.S.C.A.R. respawn after being killed?
Yes. O.S.C.A.R. isn’t a one-time boss. He respawns after a few rounds, similar to classic roaming enemies in older Zombies maps. You’re not expected to kill him every time he shows up.
Do you have to kill O.S.C.A.R. to survive on Astra Malorum?
No. You can ignore him almost entirely. He patrols the map slowly and doesn’t hard-lock onto players. If you don’t want to deal with him, keeping your distance is usually enough to stay safe.
Is killing O.S.C.A.R. required to get the LGM-1 wonder weapon?
Yes. To obtain the LGM-1, you must kill O.S.C.A.R. using the specific trap-based methods tied to the map mechanics. Simple damage-based traps will not count toward unlocking the wonder weapon.
At what point are you stuck?
